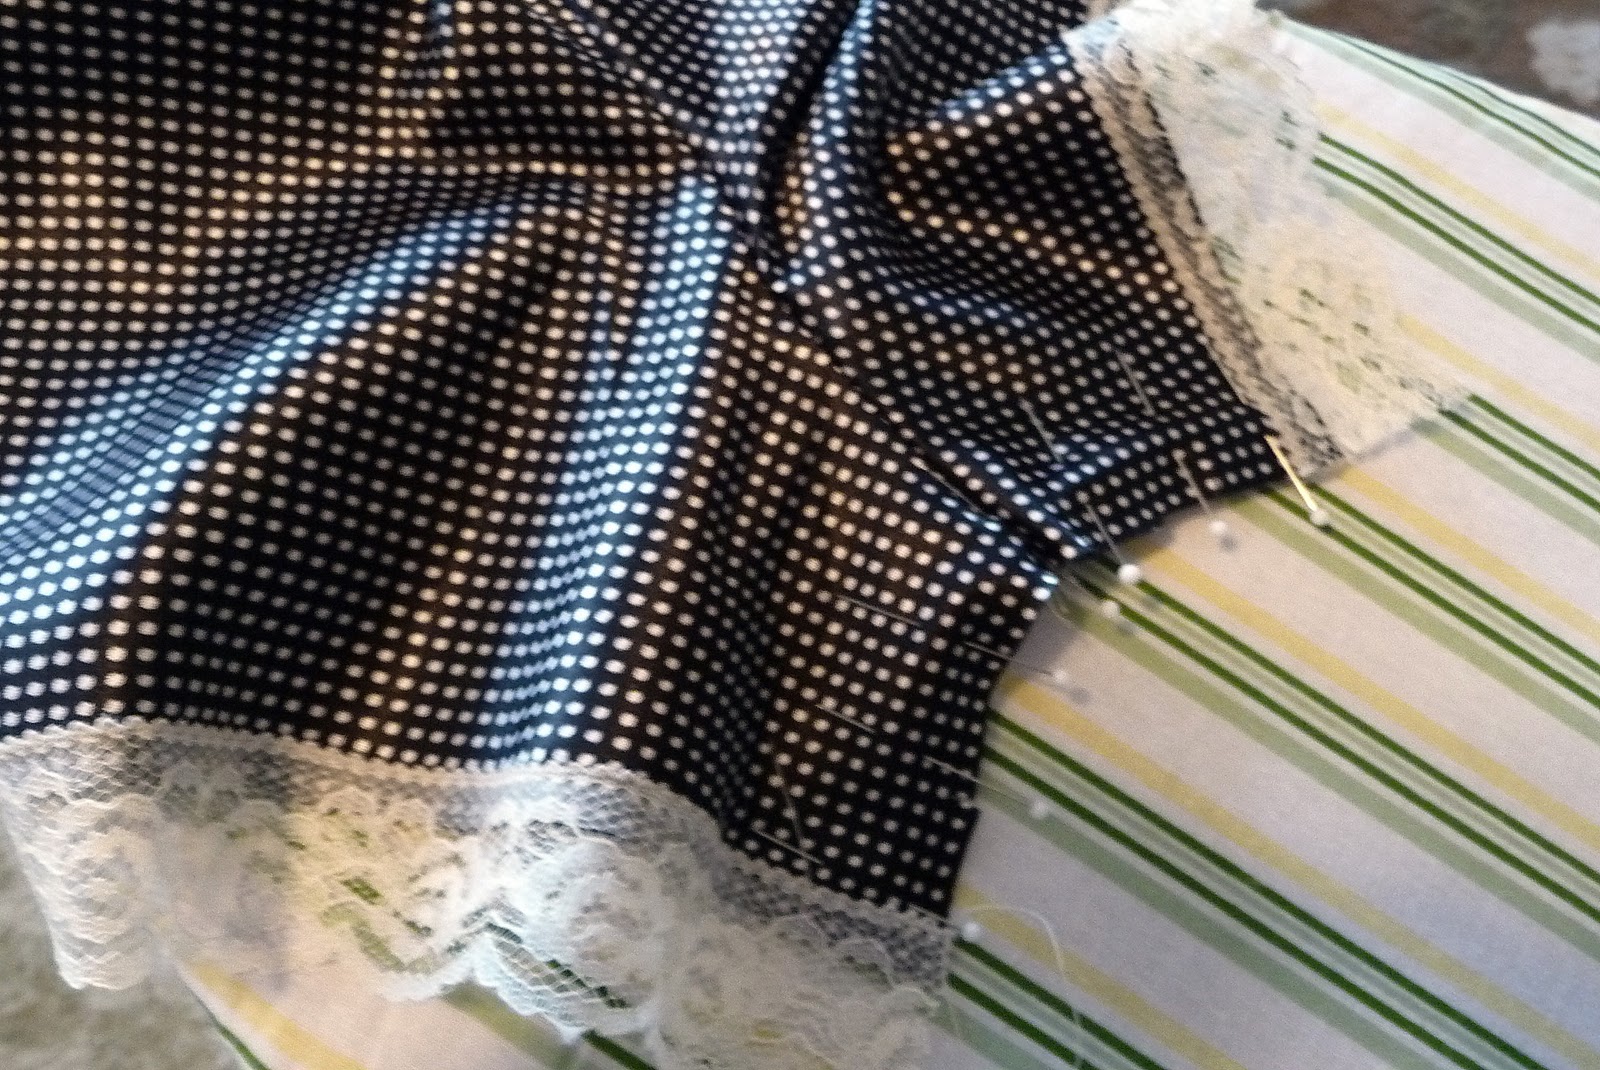
I have been buying blouse patterns... And I splurged and bought some black pindot satin at JoAnne's the other day, but then realized that I don't want a shiny black blouse with pindots... and so, I decided to make a camisole and tap pants, which I've been wearing a lot lately. I used some old cream lace that I had in my stash, and it looks sweet on the satin...
The set looks so sweet and feminine... and is just as pretty inside as out... French seams and cream lace... mmmmmmmmmm.
I'm sure most of you know what French seams are but, if not... I'll make a sort of tutorial about them, and how to press seams, too. Yay! So, without further ado... the Sweet Nothings... I have plans and materials to make two more sets, it was so easy and fun!
Project Cost: $8
Project Time: 5 hours
Pattern: One of Meemaw's she gave me long ago!!
Note to Self: I do not love the camisole, it is wearable, but not perfectly so... I think I'll try to draft a new one... or get a new cami pattern?
Well, Lovelies, the first thing that I want to say is this: sewing a garment that will last a long time, and continue to bring pleasure for years takes time to do it right. You don't just throw things together and say... ah, that's good enough! You CAN do that for things like children's halloween costumes, that are only used for one night... Who cares if they stay together or not, later?
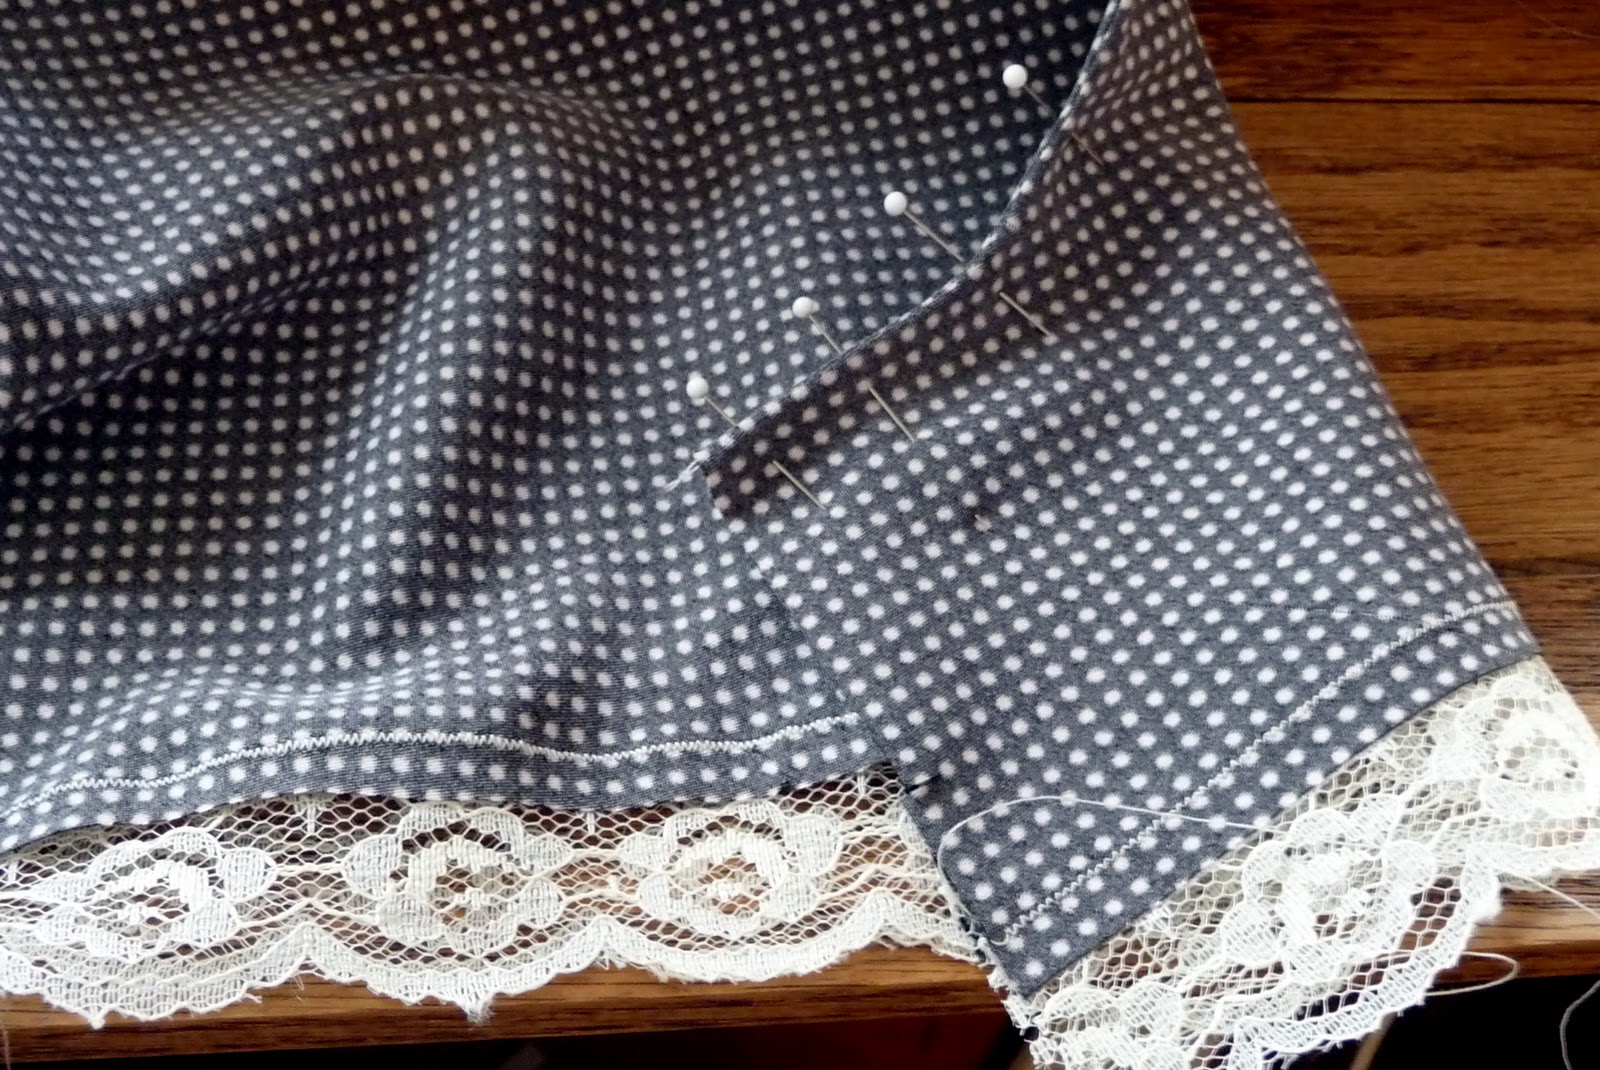
One thing that is always a temptation for me, is to leave seams unfinished... I don't like to use my serger (a whole nother issue!!!) and I dislike the look of zigzagging.... I don't have pinking shears, which really only work on things that are lined, anyway (though I'm gonna get some of those soon!) My favorite way to finish a seam is to use a French seam, which does take a little longer, but is really an economical use of your time and energy, and works really well on straight seams and fine fabrics.
Most patterns have a seam allowance of 5/8 inch.. this means that if you're using a french Seam on your garment, you first pin your garment WRONG sides together, and stitch 1/4 inch from your edge.
Then you trim your seam to 1/8 inch, you don't want little bits of your fabric getting caught in your next seam, and you don't want it to be bulky, so trim it, carefully... I usually put the seam on the left and trim from the right of it... I'm much more precise like that.
Then you press, first one way...
Then the other...
Then you turn the garment inside out and press the seam from that direction...
And then you press it folded at the seamline and pin it for sewing that same seam again...
Yes, you just pressed it four times. Pressing is sooooo important to sewing and one of the first mistakes novices make... press and press and press... your garment will look good longer, will look more professional, and will lie better on your body if you can manage to take the time to press it, correctly. Now... to do it properly you need a couple of tools I do not yet have... a tailor's ham and a sleeve roll, for curved seams and sleeves... I'll get to those eventually... So for now I just do the VERY best I can with the tools I have.
Aaaaaaaaanyway, now you make another 1/4 inch seam, with fabric pinned RIGHT sides together, and enclose your edges inside that tube you're making, as you sew....
Here's the crotch of the tap pants, with my two french seams meeting in a third french seam... see how I pressed them in opposite directions before I sewed them together? That helps take a bit of the bulk out of the seam, making it smoother...
Now, why go to all that trouble? First, it'll help the garment last longer... an exposed seam will unravel a bit every time you wash it, ESPECIALLY on fine fabrics and silks, they're slippery fibers... and you're gonna wash undies a LOT. Second, it feels smoother against your skin, and this garment is worn right next to your skin! Third, it's so pretty!!!
 I made this project a couple of years ago... when I was a bit heavier... and I wear it constantly. I wear it so much that the ribbing had all been flattened out and the sweater was covered in little linty pills that made the sweater look ratty and old... SO, I shaved it and washed it and re-blocked it and I think it looks so much like new that I thought I'd blog it! Of course... taking pics of a sweater you're wearing without a tripod isn't easy, so the styled pic is plenty blurry, also I think a bit squished vertically, but I think you'll forgive me.
Project Cost: Brown Fisherman's wool, 2 skeins... I think about $18, Vintage buttons, purchased on Etsy, $5, along with a ton of others...
Project Time: To knit, 25 hours. To wash, shave, and block, 2 hours
Note to Self: Don't sleep in this sweater anymore!! It flattens out the ribbing in the back.
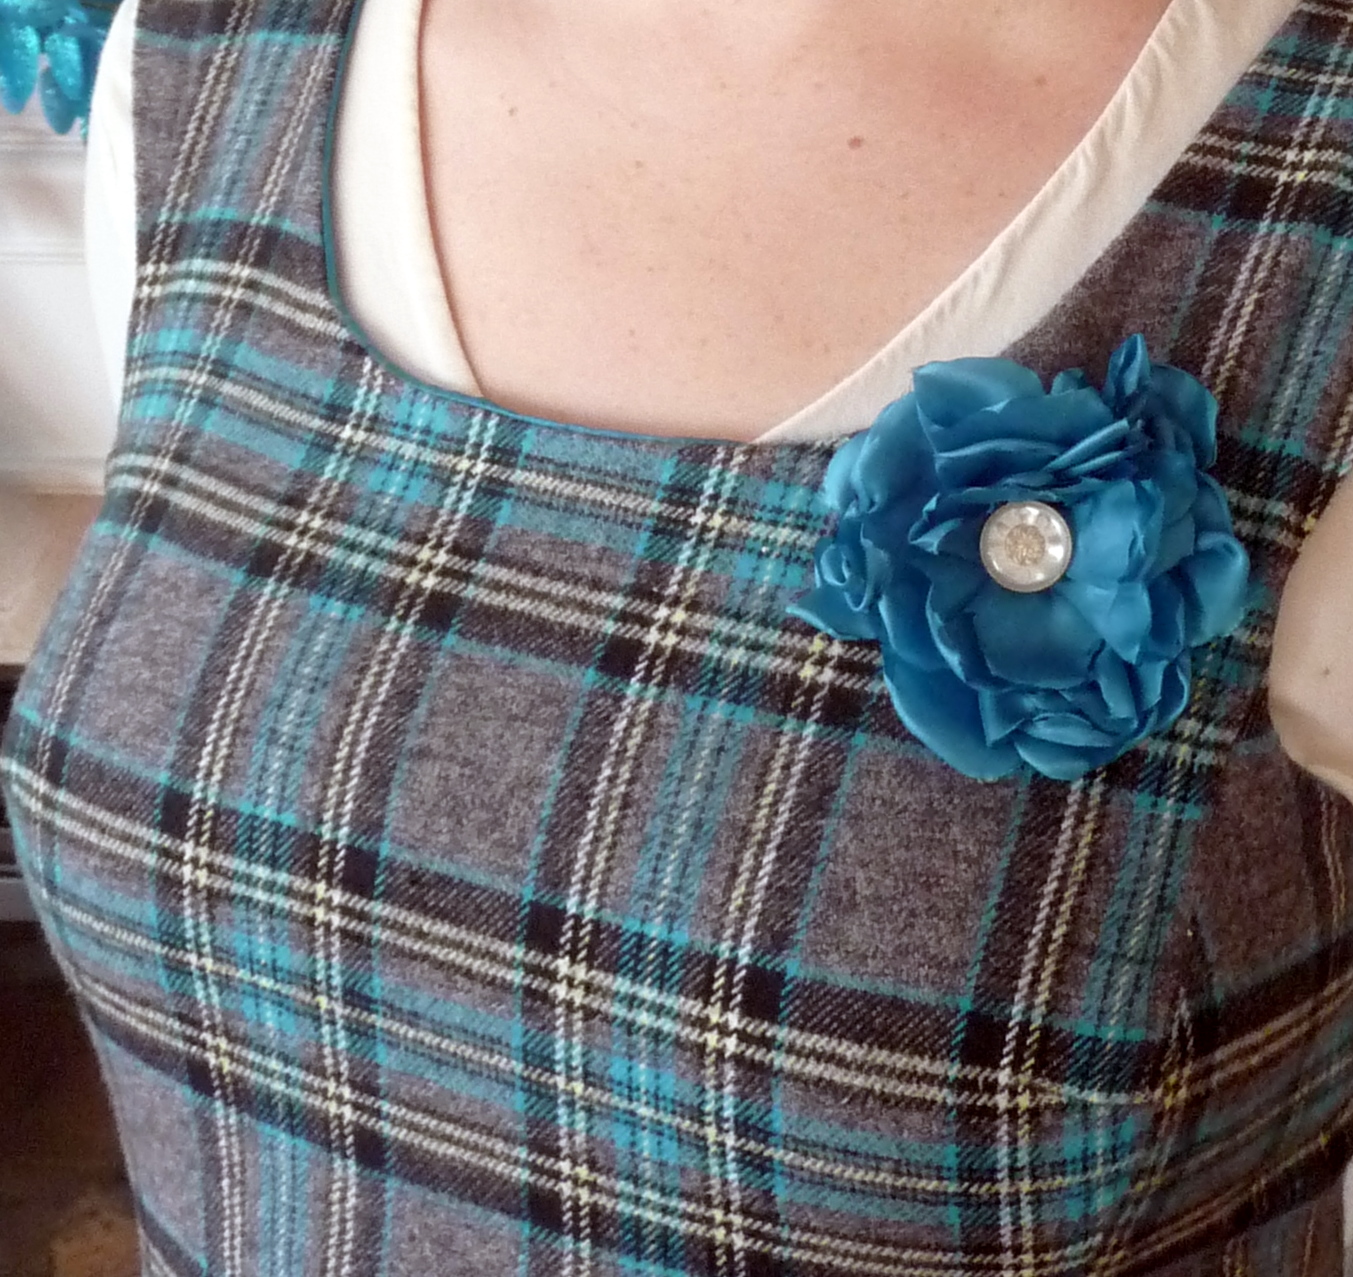
Hello all you readers... the two of you! I've finally got pictures of my new plaid dress!!! Even after a pattern change and fitting woes, it turned out to be a very successful print and has gotten tons of compliments already. I've worn it twice so far, out dancing with my hubs the day I finished it... with a white collared, button up blouse (with a little white embroidery on the collar, so ladylike!), with black fishnets and black boots... sort of a good girl gone bad look... And shopping yesterday! I got hubs to take some pics right before I left... I tried the dark tight, colored shoe look that's so in... I'm.... ambivalent about it. Should I have gone with black lace or fishnet or something???


Here you see the blue flower I knew would look so well, and I have to say I'm VERY satisfied with the fitting of the dress, especially through the bustline, though I didn't make a muslin first... the only thing I somethimes think I maybe should have done is either narrow the strap or widen the scoop?? I did alter the neckline by a good three inches, and I think it turned out wonderfully. I didn't quite get the plaid to line up on the back... I should have cut the back pieces out one at a time and made sure it matched perfectly... ah, well... it sure does take a lot of time and patience to get things just exactly how I want them!
I had a very fun Saturday, this past weekend. I went to a little cooperative venture for three businesses VERY close in proximity. the Red Thread Shop, where I made a sweet Christmas Ball Cozy in red sock yarn. This was my first beaded knitting project, and it turned out very nicely... I threaded beads onto the yarn before casting on, and then just pulled one up and knit it in, occasionally. The ladies at The Red Thread are very interested in having you sit and knit, stay and hang out... and served warm cider and cookies and coffee. They have a large, convenient range of basic yarns and a small variety of lovely luxury offerings, not to mention a perfectly wonderful place to knit!!

Next, we had lunch served by Great Harvest Bread Co., which just happens to be next to the Red Thread Shop... I had a Turkey Cobb sandwich, which was delicious... everything I eat there is amazing... annnnnnnndddd, they just happen to have a coffee drink named after the owner of the quilt shop my next projects were constructed in!
Kelly Ann's Quilting is right across the street from The Red Thread and Great Harvest Bakery. Here, I made a very sweet little woolen brooch with a few sequins and some jingle bells from some beautiful hand dyed wool felt... super soft and luxurious stuff...
I also made this little Christmas Ornament with some craft felt and sequins and embroidery thread with a jingle bell.... I think I was the only one to really make one of these in the whole group of ladies! I did some hand embroidery and then attached the sequins and sewed on a backing with a simple blanket stitch. This project seems perfect for little seamstresses... I wonder if I could get my kids to do the project, Kelly Ann sent the templates for the felt home with me... very kind!!!
I also bought a kit for a little table topper in some Christmas fabric that matches my house... It looks simple enough... The quilting fabrics here are GORGEOUS... and they offer machine quilting services, as well: an option for that quilt top I made last summer and never bothered to make a quilt out of...
I had a great day of Making in Color!
My sister came for a visit during the Thanksgiving holiday and we had a talk about a Christmas gift for me to sew for her. She was wearing a VERY cute cream t-shirt with a ballet neckline, three quarter sleeves, and a very cute navy, orange, and gold print... We were talking skirts, that I feel I look better in them and that she wishes she owned more... and then she said: "Like this top: I'd love to have a new skirt to go with this in navy with an orange edge at the bottom." I said, "What kind of fabric, denim, finewhale corduroy?? And would orange bias tape at the bottom do?"
She looked at me and said, "Why are you going to make me one?" And I of course, said, YES, and measured her... asking how long she'd like it, and writing down her measurements and making a small sketch... she wants a buttoned waist, gathered skirt, and mid thigh length with that bias hem... Really, there's no simpler skirt to make, even if I make it slightly A-Line!! The truth is I hate picking gifts, I'd much rather consult with my recipient and make sure they love it. Not much on the surprise front, perhaps, but at least the gift is actually loved!
I've already purchased the orange bias tape while at G Street Fabrics. I suppose I just need a zipper, now. I also have a little bit of navy corduroy already, I'll see if it's enough!! This may be a very ECONOMICAL gift as well!
I found a bargain!! I went to G Street Fabrics and found some 4ply silk on sale for a VERY good price, and then almost the whole store was discounted %25. I had to call home to ask hubs to find out how much fabric I needed for a sheath pattern I'd just purchased. NOW.. this is not to say the fabric wasn't still kinda pricey, it WAS. I spent $65 bucks on the pattern, fabric, and notions, including two different ribbons for belts, one green for Christmas, one red. I have a white fabric flower to wear at the waist with the ribbon. I also purchased 1/4 yard red charmeuse with a white polka dot for a bowtie... this stuff was 49.99 a yard, so... I figured it'd make a good Christmas present!! The bowtie pattern was on the LA Times website, and I bought the little three piece bowtie clips at an Etsy site (I bought a bowtie, too!)...
I'm a little nervous about this dress... it's quite sleek, not the best for my body type, but I think it'll be nice. I just need to make a muslin this time!! Make absolutely sure the fit is right! The pattern only calls for a lined bodice... I think I may line the skirt, too, however, since it's silk, and it'll cling. I'm nervous about that... not really knowing how and all! I did find this very thorough tutorial on lining a skirt with a vent from A Fashionable Stitch.